
Manual contents
User manual
Record with Apple Watch
Record on Watch alone, then review the journey on iPhone.
Initial preparation
Pair your iPhone and Apple Watch, install WayLog on both, and open each app once. Review any location or other prompts on Watch.
Watch can record on its own, so you do not need to carry iPhone throughout the trip. Bring the devices back into communication later to transfer and review records.
Start, pause, and stop on Watch
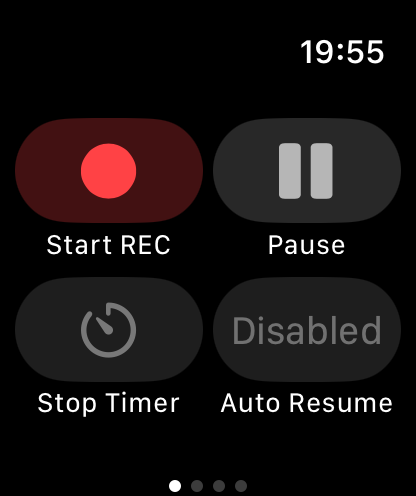
The first control screen has recording, pause, stop timer, and auto-resume buttons.
- Tap Start REC (the red circle) to start recording.
- Check time and distance on the status screen before traveling.
- Return to the controls and tap the red square to stop recording to finish.
Pause with the yellow button and resume from the same place. Set the stop timer while recording and auto-resume distance while paused.
Switch Watch screens
Swipe left or right to switch between controls, status, records, and settings on Watch.
- Status
- Check elapsed time, distance, speed, pace, and other information.
- Record List
- View records saved on the Watch.
- Settings
- Set recording resolution, default stop timer, pause-release distance, and display units. Check these separately from iPhone recording settings.
Review details on iPhone
After recording, open both apps when Watch and iPhone can communicate. Once the record transfers, open it from iPhone's Record List to review it.
On iPhone, view maps, charts, and point information and organize records with titles, tags, and notes. See Review, search & organize for details.
Open both apps and check pairing and communication. Do not delete the Watch record until you have confirmed transfer completion.